Saturday 26 July 2008

Hikizuri similar to Miyako Odori "blue line"


I won this hikizuri on eBay. Hikizuri means "trailing skirt" and they are worn for dancing, most famously by geisha and maiko (I don't claim this is a maiko hiki - it is polyester, for starters, and it doesn't have the shoulder or sleeve tucks you would expect). But nice to have in the collection anyway.


It looks like the ensembles worn for the Miyako Odori in Kyoto - click here for some more information & pictures from Mboogiedown's great blog. However, you will notice that it is different from my kimono - my hiki has an all-over komon pattern, whereas the real Miyako Odori hikizuri have a different design on the "skirt" area (i.e. arranged as are eba komon designs).


The exact detail of the Miyako Odori kimono and obi have changed over the years - I found various pictures on the internet - try searching with "Miyako Odori" under Google images and you will turn up quite a lot of pics. Main differences seem to be with the lower part of the hikizuri design, although there was one set that were green rather than blue backgrounds. Also from Mboogiedown's blog -

Heisei 20 (this year) -

Heisei 5 (1993)

Showa 59 (1984)


Showa 53 (1978)


I also noticed that the obi designs changed - from formal chrysanthemum (almost like karabana - imaginary flowers) to maple leaves! The obi are tied in a darari style, but without the very long ends that maiko usually wear.

To go with my hikizuri, I looked around for a suitable fukuro obi to remake in a pre-tied darari style. Fukuro obi are too short to make as a true darai, but Ichiroya have sold darari tsuke (pre-tied) obi made from fukuro obi, so I figured I could make one too. I would have liked to find a fukuro obi with the genji guruma (carriage wheel) design shown in the 2008 ensemble above, but couldn't find anything like it - rather frustrating because I have another fukuro obi with the same motif but with white bands in the background!

Here is the raw material - a second hand fukuro obi with a suitable pattern. Since the design change, I felt it was more important to go for the same style of design rather than the same motif itself.

I'll cut it and pre-make the obi musubi (bow) like this -
Pre-sewing the obi bow like this means I can get by with considerably less length than a darari bow tied with a suitable obi (which would need to be over 6 metres long, while fukuro is only 4.2 metres, and usually only 60% patterned too).

Monday 21 July 2008

O-neesan quilt pattern in Popular Patchwork


The pattern for the little wallhanging I made for this year's Quiltfest challenge, "O-neesan" (above), is featured in August's Popular Patchwork magazine. It will be available in the shops till July 31st - if you can't find it, you might be able to get hold of a copy via the Popular Patchwork website - the site is well worth a look around even it you have already got your magazine this month!

Sunday 20 July 2008

Japan Day in Liverpool

I have just about recovered from yesterday - I was much too tired to blog when I got home!

Japan Day was held at the Guild of Students, Liverpool University. The building looked like it was new in the Beatles' day. Very early sixties and showed it. The get in got off to a bad start. The organisers (Japan Society North West) had sent some maps but nothing that showed which unloading door actually was "door C". Also nothing to indicate that there were about 12 steps up to the door. There was a hydraulic lift, which was kept firmly padlocked during the whole of the get in and get out - surely that would have helped the people selling Japanese furniture (Tansu).

We are just too used to doing shows with professional events organisers like Grosvenor Exhibitions and Creative Exhibitions (Twisted Thread) who have it all organised!

Arriving in the hall, I was surprised that my area wasn't labelled or marked out on the floor in any way. Originally, I was supposed to be stand 19, then it got changed to 17 - not a problem, but nothing where either space should have been. I hunted down one of the organisers and he told me we would need to set up behind the steel shutter that linked the hall to the bar area. The shutter would be raised so the Ambassador could make a grand entrance to the stage. So we had to cart everything through two sets of fire doors and attempt to set up the table working only from the back - if they had just raised the shutter for half an hour, we could have got everything in so much quicker. It was so dark in the bar, I put my apron on inside out and I couldn't see to prep or mark out anything. When the shutter was raised, it wasn't much better. I had to get a cloth from the bar to try to clean the beer off the shelf next to us - the floor tiles were sticky with beer all over. JAL, the sponsors, had a display board partly blocking access to our space. Once a member of the public had managed to fall over it, we moved it to one side... You can see how gloomy it is by the shadow on the side wall!


The organisers didn't seem to understand my concerns re Health and Safety of trying to have three demo stands set up with four 6ft tables in an open quad formation, with all the demonstrators inside the square. They already knew I had a quilt display frame to fit in there. We had to move the tables, or we would have been falling over each other. My neighbours had asked for electricity to run their laptop slideshow, but we realised after a few hours (presumably when the battery started to run low) that the socket wasn't working at all.

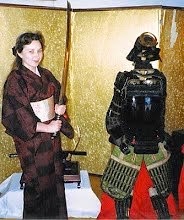
The poor lighting meant visitors couldn't really see what I was doing and my display was in semi darkness. People couldn't see the colour of the fabric I was working on, it was that bad! The flahs photos make it look better than it was. Really, it was not necessary for the three demo spaces to be pushed back into the bar, as the space in front only gave visitors an overspill and access to the side of the stage, which would have been blocked off by our stands if we had been in the hall, stopping members of the public strolling through the area where aikido and other martial arts demonstrators were trying to group before their stage spots. The anime (Japanese cartoon) artist was also in semi darkness and we had to loan her a table cover to hide the scrappy table top.

I can't tell you who all the demonstrators and traders were, as the organisers didn't give each stand a show guide (normal practice at most events like this). There was some stunning Japanese embroidery and the bonsai display was beautiful. Your could try out things like origami. An interesting display of Japanese model railways -


The best part of the day was meeting up with some other members from the Immortal Geisha forums - Shigatsuhana and Umeboshi san. I'll post photos later. There are more pictures there too (scroll down the page).

I had a good viewpoint for all the stage events, so that was interesting, but there wasn't much time to see the rest. The taiko drumming was great. The group explained their style was from Western Japan, and it certainly had a different sound from Yuza Taiko - including a large gong in the ensemble. They had a very young dancer who was really energetic. I was interested to know more about the dancing, because it was quite unusual, but didn't get a chance to chat. Once everything was over, the hall staff wanted us out asap, and were hassling us to get our stuff out of the bar so they could close the shutter again! The taiko group had to carry their drums (big stuff) down the flight of steps.

Eventually, I piled the rest of my stuff on one of the trestle tables and dragged it over the shutter cill. My last glimpse of the hall was of the manager hassling the staff from Tansu about when they would finish getting their furniture out! They had put out a very impressive display.

In evaluation, I wouldn't pay to demo sashiko at another event like this. I would rather attend as a visitor or go as an all out trader with my kimono and Japanese fabrics. People really want to see a version of Japan that fits their preconceptions - plenty of martial arts, maybe some people in kimono, drumming, bonsai etc. The Japan of travel brochures. It would have been just as productive and more fun to go as a visitor. Here is a composite "Japanese" picture for you - koi from Teien garden with the bridge from Mt Haguro - in almost tourist brochure style!

Friday 18 July 2008

IQ test repeated

What's your IQ?
Free-IQTest.net - What's your IQ?

153 this time. Either I am feeling sharper or the test is at fault! It must be giving an artificially high IQ rating, but it is fun to do anyway. The test is definitely biased towards people who are used to working with things like number sequences, geometric progressions etc. So quilters should score quite high!

If you try the test, just make sure you don't sign up for any of the adverts that appear after you've put in your e mail address to get your result - you don't want any junk mail!

IQ - 148

IQ Test
Free-IQTest.net - IQ Test

I've always been curious to know what my IQ is, so I did this test a week ago. Interesting results. A lot of the visual puzzles & "next in sequence" kind of questions are probably easier to answer if you are used to working with geometry in the way many quilters do.

Anyway, it came out at 148. That can't be right - I think the test was too easy. With a bit more concentration (and maybe not doing the test at 10p.m.) I wonder if I can do better. Don't know what I'll do with this information though!

Friday - window installed

As soon as the tarpaulin was off, Takenoko decided to be a lolcat -

The window arrived at 11 a.m. today. A perfect fit. It didn't take long for it to be installed. Frame first -

Then the glazing. Already is is feeling warmer inside.

Bernard pointed under the window to finish it off.

All done! So from this -
- to this in just 3 1/2 days work. Thanks very much to Bernard & Dad.

Thursday 17 July 2008

Day four - window delayed

I found out yesterday that the window wouldn't be arriving till Friday a.m. It was ordered for Thursday afternoon and I'd hoped we could bring delivery forward. So we had a day to use up. We had planned to get on with the patio - building the wooden framing, leveling the rubble in it and adding a dry mix of sand and cement. However, Mount Zion showed its usual weather - rain and wind - so I suggested a trip to Plas Newydd, Llangollen, until the weather (hopefully) cleared. Of course, it wasn't raining there.

I'll write some more about this amazing and inspiring house in another post (with more pictures) but for now will say that Bernard was quite taken with the carvings in the house. Bladenburn might be getting a porch with a doorway based on this -
When we got back, the weather wasn't much better, so after finishing slotting in the damp proof strips down the sides of the window opening -
we called it a day with the last of the toasted muffins! After that, we had a quick trip out to see the Minera Lead Mines and Bersham Ironworks, via Minera.

Another brick in the wall - day 3

The foundation for the new wall set overnight and this morning we were ready for Bernard to start building the wall. As I hadn't found enough of the original bricks to do the lozenge feature I wanted in the centre of the panel, I went back to Build Centre to get four bricks, remembering this time to take one of the Ibstock Ravenstone Gold bricks for a colour match. Applying my quilter's logic to the non-availability of the Ravenstone Gold bricks (nationwide - these went out of production in about 2001), we went for a colour and tone match primarily, rather than texture, so the new bricks in the lozenge will "read" as the same colour & tone as the house bricks. Being surrounded by the Staffordshire Blues will visually separate them from the house bricks anyway, adding to the illusion. You can see a pic of them in the wall at the end of this post, so see what you think.

A bit more cutting out with the stelsaw was needed for the damp proof membrane around the sides of the window.

That stelsaw is made by... Husquavarna. Seriously. So I have had a brand new Husquavarna working in my sewing room! It also makes a good job of cutting the super-hard Staffordshire Blues. Though I don't think it would be much good for stitching.

The bricks and internal blocks are held in place with metal ties, up the sides of the brick & block panels. These were cut to size with a hacksaw, before being screwed on either side of the existing wall cavity.
Takenoko doesn't know what to make of all this.
Bernard mixed all the dabo by hand (every time he says "dah-boh", I think of Japanese fabric company Daiwabo ). As the Staffordshire Blues are a very hard, non-absorbent brick (unlike normal building bricks), this has to be a stiffer mortar mix than usual.

These bricks just don't absorb water and they were once used as damp proof course bricks without adding any damp proof course membrane like we do today. This also means it takes longer for the mortar to dry out enough for pointing the bricks (tidying up the mortar joints between the bricks) - they haven't been pointed yet in the photo below, which is why the wall doesn't look very finished (also there's a gap for the four brick diamond pattern to go in).

I love the colour.

There's also insulation in the wall - 2in (5cm) thick polystyrene, which has to be cut into panels to fit between the brick ties that hold the inner blockwork wall to the outer brick wall. Enough was leftover to make a good design board, once I've cleaned it and covered it with calico.

We decided to follow tradition and embed some coins in the mortar mix. This means you will never be without money in the house. We added - 1 x 5p, 4 x 1p and 1 x 5 yen (with a hole in the middle). Two of the pennies were 2008 date. It reminded me of the Japanese tradition where roofers have a topping off ceremony when the roof tiling is finished and throw 5 yen coins into the street.


I laid the third brick from the right on the top row.
The brickwork finished - from outside and inside (you can see the wire brick ties to attach the brick wall to the blockwork inside).

The bricks are pointed - you can see here how the panel is set back about an inch, to make more of a feature but the foundation rows line up with the bricks at the base of the main house walls.
Top of the brick wall - you can see how the polystyrene goes into the cavity in the garage walls on either side of the new wall. The metal strips on the top are used to link the brick and block wall to the metal strips - they slide down the metal tie strips and are set in horizontally in the mortar layers. Once slid down the ties, they can't be pushed up again.

The polystyrene sheet is added as the inner wall is built, pushed back in the cavity so there is an air gap between the outer brick wall and the poly. It is a more expensive option than rockwool but it won't let moisture through like rockwool can. All the discussions about different kinds of insulation layers makes me think of different quilt waddings (batting) and the different warmth/wear/breathability with cotton, poly, wool, silk or blends. The thermal and moisture resistance properties of this wall should be excellent, as not only is is built from water resistant brick and has a water resistant insulation, it is 13in deep it is also 2ins deeper than a normal wall (to line up with the back of the garage pillars).
I made a "time capsule" to put in the wall. I put a selection of these pictures in it, plus some printouts from my website, sealed it up in two layers of plastic and wrapped it in tape. It isn't too buried in the wall - if anyone changes the window, they might spot it. Bernard wedged it in between the polystyrene batting and the outer We included photos of things like using the petrol stelsaw, as I'm sure in 100 years time, people won't be using gear like that!
The finished wall! The last pieces of polystyrene are used to close up the gap at the top.

We celebrated Bernard completing the wall with a trip to Weatherspoons The Golden Cape at Mold (again). Takenoko celebrated the wall by jumping over it...